
- 12
- Feb
Hvordan bygge de ildfaste mursteinene til kjelen?
How to build the refractory bricks of kjelen?
1. The construction steps are carried out in accordance with the principle of from bottom to top and from inside to outside. The lower part of the upper drum and the convection tube bundle interval flame plate are poured from top to bottom.
2. The furnace wall has high air-tightness requirements, and the fullness of ash joints: red bricks are not less than 85%; refractory bricks are not less than 90%. The squeezing method is used for red brick masonry, and the scraping method is used for refractory brick masonry.
3. Masonry of furnace bottom:
(1) Before the furnace bottom is laid, the foundation should be leveled, and the surrounding straight walls in contact with the furnace bottom should be built first, and the height should be approximately higher than the surface of the furnace bottom. Then mark the horizontal line of the furnace bottom (in the case of multi-layer masonry, together with the number of layers) on the straight wall before the furnace bottom can be built.
(2) When the furnace bottom is composed of multiple layers of bricks, the masonry should be carried out layer by layer, with the upper and lower layers and the same layer of bricks staggered, and the long sides of the most surface layer bricks are perpendicular to the flow direction of slag or gas.
(3) In high-temperature areas and furnace bottoms that often need to be overhauled, an expansion gap should be left at the contact between the furnace bottom and the straight wall, and asbestos rope or pad asbestos board should be embedded in the gap.
4. Masonry of ash bucket (including inclined wall):
(1) Før du bygger askebøtten, finn først ut den horisontale senterlinjen i henhold til tegningene, og bruk den horisontale senterlinjen for å finne den langsgående senterlinjen til hver askebøtte og ytterkantene av de fremre og bakre rette veggene ved den tykke slaggen bøtte, og baser deretter forhøyningen i begge ender. Sprett opp den vertikale senterlinjen til bunnen av askebeholderen, og still inn størrelsen på bunnen av askebeholderen. Etter å ha slått den vertikale hjelpelinjen, bruk den produserte trekantmalen (laget i henhold til helningen til den skrå veggen på tegningen), og tegn sidelinjen til den skrå veggen på begge ender av fundamentstativet. Flate. Bruk det samme materialet som ildfast betong for å gjøre det trekantede tilbakeslaget i bunnen av den skrå veggen (som vist i figur 1) og nivellere den rette veggen. Det trekantede tilbakeslaget i krysset mellom de vertikale, horisontale og skrånende veggene skal også støpes med ildfast betong av samme materiale. Fortsett til murte skråvegger.
(2) When building the ash bucket, first build the horizontal and then the vertical; when the inclined wall and the straight wall are formed, build the straight wall first and then the inclined wall.
(3) Når det er fundamentstøtte på baksiden av den skrå veggen, bør mørtelen på kontaktflaten mellom mursteinene og fundamentet være full; Når slagg, må slagg komprimeres.
5. Masonry of straight walls:
(1) The straight walls around the boiler are composed of refractory bricks, thermal insulation bricks (or thermal insulation layer), and red bricks. The order of masonry construction is to build refractory bricks first, then thermal insulation bricks (or paste insulation boards or felt), and finally red bricks. For example, when the hot joint between the refractory brick and the red brick is filled, the filler should be filled every 3 to 4 layers of the red brick, and the filling should be dense.
(2) When building a straight wall, it must be placed at the corner of the furnace wall. The two ends of the straight section must be yarded with 2~3 layers of heads, and the horizontal line must be held. Build the mortar joints, leave the expansion joints in place, hang the vertical expansion joints asbestos ropes, and paste the asbestos panels on the steel frame facade before proceeding to masonry.
(3) The masonry method of straight wall masonry is: 1/2 brick thick wall adopts staggered joints and 1/2 brick length masonry; 1 brick and above thick wall adopts one top and one straight or lock package masonry method . The top or bottom layer of bricks of 1 brick and 1 brick thick masonry shall be top or side masonry.
(4) When both sides of the furnace wall are working surfaces (except for walls with a thickness of 1 brick or less), both sides are to be laid at the same time.
(5) The water-cooled wall header and the pipe side and the sliding support of the pipe side passing through the masonry shall not be fixed, and the special-shaped brick at the pull hook of the water-cooled wall shall not jam the ear plate of the water-cooled wall.
(6) Når de ildfaste mursteinene og røde mursteinene er satt sammen, når de ildfaste mursteinene bygges med 6 til 8 lag mursteinshøyde, hver 1 til 1.5 m langs horisontal retning, må 115 mm lange strakte murstein forlenges til ytterveggen av de røde mursteinene. Spenne murstein skal kobles fra på samme lag, og øvre og nedre lag skal forskjøves.
(7) When building the outer wall of red bricks, vent holes must be provided, and the distribution of the reserved space should be even. One can be reserved at about 2m2 and buried with DN15~20 black iron pipes (in the case of unavoidable circumstances, use reserved 60 ×120mm hole method). Boilers with grate start to be set up when the grate is flush; boilers without grate start to be set up at an elevation of about 1m, and the highest point of the insulation seam must also be set up, and the furnace shall be blocked with temperature-resistant materials immediately after the oven is completed.
6. Murverket av ovnsveggåpninger, inspeksjonshull osv. tar i bruk murmetoden at de ildfaste mursteinene til innerveggen trenger inn til de røde mursteinene til ytterveggen (se figur 2). Når det kreves øvre dekkeutforming av åpningen (hullet), skal murverket bygges i henhold til designkravene, og når utformingen ikke er påkrevd skal murverket bygges på følgende måte:
(1) The width of the hole (hole) in the wall is less than or equal to 450mm. If the span is not large, the solid platform method can be used to replace the small arch with a flat brick layer. The masonry method is shown in Figure 3. Each layer shall protrude ≤6mm from both sides into the opening until the opening is covered. The protruding length of each layer and the same layer shall be the same.
(2) Bredden på åpningen (hullet) i veggen ≤250mm kan dekkes av bearbeiding av murstein. Murmetoden er vist i figur 4.
(3) The width of the hole in the wall> 450mm width shall be covered by arch-rotating masonry.
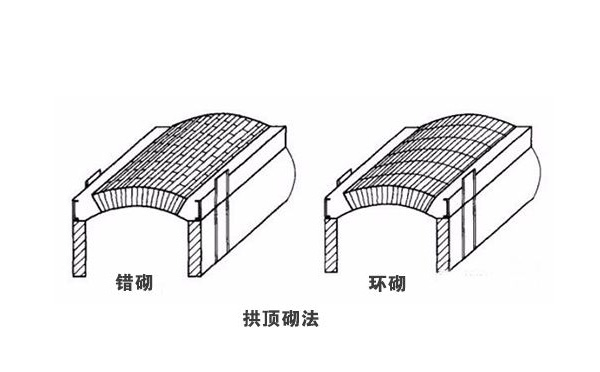
7. Masonry of arch and vault:
(1) Dekkformradius og radianproduksjonsstørrelse som kreves for bue- og hvelvmurverk må oppfylle designkravene. Spennvidden til dekkformen er mindre enn den faktiske spennvidden med 20 ~ 30 mm, overflaten er flat og glatt, og den har bærende materialer og konstruksjonsbelastninger uten deformasjonsevne.
(2) Before arch masonry, the masonry behind the arch-foot bricks must be completed, and the masonry can only be built after passing the inspection. After the arch-foot bricks, it is not allowed to build heat-insulating refractory bricks or brick algae earth bricks.
(3) Before the arch top is built, the arch toe beam and the frame column must be close together. Before laying the arch of the adjustable frame, the frame and the tie rods must be adjusted and fixed, and passed the inspection.
(4) Før murverket med bue og hvelv, installer først dekkformen, kontroller høyden og posisjonen, fest den godt, og utfør deretter formuring. Formålet med formuring er i hovedsak å justere mørtelfugene og montere buesteinene. Modell for å møte kravene til buemurkvalitet og forskjøvede fuger. Etter at monteringsarrangementet i buestein oppfyller kravene, nummereres teglflatene i henhold til rekkefølgen på murverket og deretter fjernes, som vist i figur 5. Murverket skal samtidig bygges symmetrisk fra buefoten til midten. Det er strengt forbudt å snu opp ned murverket.
(5) Med mindre det er spesielle forskrifter, skal buer og hvelv legges i forskjøvede skjøter, og buer og hvelv med ulikt spenn kan legges i ringer. Ved forskjøvet fugemur, når lengden på langsgående fuge er lengre enn 1 meter, skal murverket tegnes med strek.
(6) Lock bricks must be installed in the masonry of the arch and vault top. The depth of the built-in lock bricks is 2/3~3/4 of the thickness of the arch and vault top. As shown in Figure 6, the lock depth of the same arch must be the same. , When locking in, it should be from the tighter lock to the looser. In the wall, several adjacent arches and the lock bricks of the arch roof must be driven in at the same time to prevent the deformation of the adjacent arches.
(7) The lock bricks are distributed evenly and symmetrically. Drive into one lock brick for span <3m, and drive 3 lock bricks for span> 3m. You can use a hammer to drive in when it is locked, but it must be padded with a wooden board.
(8) Det er ikke tillatt å bruke murstein som har en tykkelse på mer enn 1/3 eller skjære langsiden for å gjøre den store flaten til kileform som låsestein.
(9) For the processed bricks that are leveled on the upper part of the arch and the vault, the high temperature area or the surface of the external wall can be leveled by brick processing, and the low temperature area can be leveled by the same material of refractory concrete.
8. Upside-down masonry:
(1) Two arc-shaped boards inside and outside are made when turning upside-down masonry. The inner arc plate is made according to the radius of the rotation; the outer arc plate is made with the inner radius plus the thickness of the rotating brick.
(2) Når man bygger opp-ned-rotasjon, er den nederste senterlinjen av rotasjonen basert på den bueformede platen, og den nedre delen bygges. Vanligvis kan lengden på mursteinen møte 5~7 roterende murstein, så kan du begynne å bygge opp ned. Roter, og bygg deretter symmetrisk opp ned fra midten av bunnen av opp ned til begge sider. Ikke slå for hardt når du begynner å bygge for å unngå å skifte eller løsne. Etter at 5 ~ 7 murstein er bygget i den nedre delen av den omvendte skruen, festes den indre bueformede brettet på overflaten av den roterende mursteinen, og mursteinene legges symmetrisk på begge sider i rekkefølgen til å rotere mursteinene og deretter bearbeide mursteinene. Murrekkefølgen er vist i figur 7.
(3) When turning to 1/2 circle, the upper 1/2 adopts arch and vault masonry. When locking the bricks, turn the bricks around 1/2 of the upper vector height and then lock the bricks after the masonry is finished, as shown in Figure 8.
9. Muring av hengende murstein og riving av flammevegger:
(1) Hanging bricks and removing flame walls follow the principle of building from low to high, from the middle to both sides.
(2). When bricks need to be processed for the construction of hanging bricks and flame-removing walls, the clearance of the hanging holes of the hanging bricks shall not be greater than 5mm, and the thickness of the flame-removing walls shall not be less than 90%. There shall be no cracks in the main force-bearing parts of the hanging bricks.
(3) For spesialformede murstein med festeboltehull, tørk først rad for lag for prøvelegging, og etter markering av boltehullene på røret kan festeboltene sveises. Mutrene bør ikke strammes for hardt under muringen for å unngå å skade de ildfaste mursteinene, og boltehullene skal fylles med ildfast betong.
10. The expansion joints of the furnace wall are left:
(1) Plassering og form av ekspansjonsfugene på ovnsveggen er i samsvar med designkravene. Bredden tillates ikke å være mindre enn designkravene, og harde gjenstander som knuste murstein får ikke falle ned i fugene. Pakningen i ekspansjonsfugen er tettpakket i henhold til designkravene. Når det brukes asbesttau, må det første tauet til flammeoverflaten være dynket i ildfast gjørme.
(2) Vannveggrør, fallrør, samlerør, kloakkrør, tromler, temperaturmålehull (rør) og bjelker, etc., gjennom veggen, etterlater ekspansjonsfuger ved kontaktveggen og de vertikale og horisontale forbindelsene til den ildfaste murovnen vegg. Det er bedre å vinde med asbesttau.
(3) The method of leaving the expansion joint of the furnace wall:
①. Metoden for å holde ekspansjonsfuger i hjørnene er vist i figur 9(a): metoden for å forlate krysset mellom 1/2 murstein og 1 murstein; Figur 9(b): metoden for å forlate krysset mellom 1 murstein og 1 murstein.
②. The method of setting expansion joints at the junction of the two ends of the demolition wall and the furnace wall is shown in Figure 10.
③. Den vertikale ekspansjonsfugen i midten av ovnsveggen er vist i figur 11.
④. The method of setting expansion joints at the junction of the furnace roof and the two ends of the hanging arch and the furnace wall is shown in Figure 12.
⑤ The horizontal expansion joints of the furnace wall are generally made of special-shaped bricks. If there are no special-shaped bricks, the method shown in Figure 13 is used for masonry. When laying the horizontal expansion joint, the asbestos rope should be compressed; the height of the refractory bricks above the horizontal expansion joint should not exceed 1m, and the refractory bricks and red bricks will rise alternately to prevent the asbestos rope from being compressed and causing the furnace wall to tilt.
(4) The vertical expansion joint hangs the line for masonry, the wrong tooth is no more than 3mm, and the asbestos rope in the expansion joint is slightly larger than the remaining width of the expansion joint by 3~5mm, and it is pressed in at the same time during the masonry.
11. Refractory bricks and thermal insulation bricks are not allowed to wet the bricks, and the red bricks must be watered until the outside is dry and the inside is saturated before the red bricks are built.
12. It is not allowed to process bricks or walk on the masonry, and it is not allowed to face the processing surface of the bricks to the flame surface.
13. The surfaces of refractory bricks and red bricks must be jointed. Where the convection tube bundles are concentrated and where the boiler accessories are blocked, the ash ears must be scraped off along with the masonry.
Construction is often a link that companies tend to ignore. They always think that good products and good designs can guarantee the service life of the kiln. In the national standard, there are strict regulations on the construction of rotary kiln, as follows: